How to Schedule a Post in WordPress

Here’s a quick how-to post detailing how to schedule a post in WordPress. Essential knowledge for regular bloggers, those that host blog tours, or if you’re going to be away from the computer for a few days. It means you can simply set up your post, then forget about it until it goes live. (Please note: Occasionally, WordPress will miss schedule with a post, so please keep an eye out for that. But it’s incredibly rare.)

(Click on any of the screenshots to enlarge them)

1. Log into your WordPress site as you would normally, then navigate to create a new post.

Screenshot 2016-02-04 17.38.43

2. Write your post as you would normally.

Screenshot 2016-02-04 17.39.48

3. Under the ‘publish’ box, click ‘edit’ next to the part that says ‘publish immediately’ and you’ll see a series of pull down lists and boxes where you can enter the date and time you’d like the post to publish. Fill them in with the date and time you want to schedule your post for.

Screenshot 2016-02-04 17.40.07

4. Click ‘OK’, then click the ‘schedule’ button.

Screenshot 2016-02-04 17.40.12

5. You’re all set! Navigate back to your ‘posts’ menu, and you’ll see your scheduled post sitting above your already-published posts with a message next to the post title saying ‘scheduled’ and the date over on the right hand side so you can see at a glance when it’s scheduled for.

Screenshot 2016-02-04 17.40.33

If you found this article useful, please consider sharing it with others. Thank you!

How to Schedule a Post in Blogger

Here’s a quick how-to post detailing how to schedule a post in Blogger. Essential knowledge for regular bloggers, those that host blog tours, or if you’re going to be away from the computer for a few days. It means you can simply set up your post, then forget about it until it goes live. (Please note: Occasionally, Blogger will miss schedule with a post, so please keep an eye out for that. But it’s incredibly rare.)

(Click on any of the screenshots to enlarge them)

1. Log in to your Blogger blog as normal, and click to create a new post.

Screenshot 2015-12-30 11.18.56

2. Compile your post as normal. Then, when you’re done, click ‘schedule’ on the right hand side and it will open up this drop down menu. Select the date and time you want the post to go live (be sure to double check the time zone your blog is set up for, if the post needs to be live at a certain time), then click ‘done’.

Screenshot 2015-12-30 11.19.25


3. The drop down menu will close, and the date and time you selected will be stored, ready to go. Click ‘publish’.

Screenshot 2015-12-30 11.19.37


4. You’ll then be pinged back to your list of blog posts. Right there, in the list, will be your scheduled blog post, sitting there ready to go for whenever you’ve set it up. Voila!

Screenshot 2015-12-30 11.19.56

If you found this article useful, please consider sharing it with others. Thank you!

Teaching at Swanwick Writers’ School in August

Hi all,

swanwicklogoI’m delighted to announce that I’ve been asked to teach a short course at Swanwick Writers’ School in August. The course is entitled PR and Marketing for Writers – Making Technology Work For You.

Here’s the information for the two hour course:

This informative course is designed to help you get the most out of technology in order to promote your books as quickly and effectively as possible—giving you more time to dedicate to the most important part… writing more books!

Topics that will be covered include:

  • Social media—posting to multiple accounts, scheduling in advance, using Triberr
  • Blogging—scheduling in advance, promoting via social media, making it easy for others to share your posts
  • Google Analytics—finding out where your website traffic comes from in order to concentrate your efforts in the best place

There will also be time allotted for a Q&A session where Lucy will do her best to answer your burning questions.

This particular course is on the 12th August, though the writers’ school runs all week and has a schedule jam-packed with fantastic sessions, workshops and tutorials.

For more information and to book your place, visit the Swanwick Writers’ School website.

Why Use Triberr?

Hi everyone,

I’m writing this post due to popular demand. I’ve had several clients ask me about Triberr, what it is, why they should be using it and how much time it will take up. I’ll do my best to answer these questions, and probably more, without writing a blog post that will be the same length as my latest novel 😉

Here goes…

Screenshot 2014-03-13 10.19.02

1. What is Triberr?

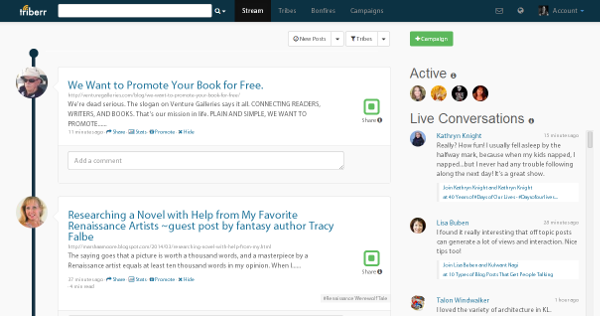
Triberr is a type of social sharing site where a user will join “tribes” that are relevant to the content they create on their blogs. So, for example, I’m in several writing, erotica, erotic romance and romance-type tribes. Once a user’s account is set up correctly, their blog’s RSS feed will automatically add each new post into the streams of people who are in the same tribes as them. The idea of this is that because people in tribes share similar interests, the posts they will see in their streams are things they will want to share with their own followers. Which brings me neatly onto point #2.

2. Why should you be using it?

Because it increases your reach. Massively. At the time of writing this post, I have 5,653 Twitter followers. So when I go into Triberr and approve other people’s relevant posts (this is key for me. I don’t want to alienate my followers by Tweeting stuff about children’s books or young adult), they will automatically be Tweeted onto my account. Not all at once, but at intervals set by me, which are half an hour.

Imagine this reversed. Because each of my blog posts are fed into Triberr, they’ll appear on my tribemates’ feeds and they’ll share them. So without Triberr, my Tweets would be seen by 5,653 people and probably then by others because my followers have Retweeted me. But with Triberr, my blog posts are automatically fed to the Twitter feed of every tribemate that approved my post – and because I’m in tribes that are relevant to my work, this is most of them. So, depending on how many Twitter followers each of my tribemates has, you can see how much my reach increases. The biggest reach of the tribes that I’m in is 452,533 people! That’s HUGE!

3. How much time will it take up?

Not much is the short answer. If you simply join us as a member and don’t have a tribe of your own (there are currently enough tribes out there that you don’t need to worry about setting up your own), it’s a quick and easy thing. Now I have everything set up correctly, I probably spend ten minutes per day approving relevant posts. I know we’re all busy people, but this is a tiny portion of time compared to the potential benefits. Because if you’re seen to be active, to be approving other people’s posts, then they’ll approve yours, too. So where your blog posts might have only reached 6,000 followers beforehand, with Triberr this is multiplied many fold with a small amount of time on your part.

I realise this is a really, really short piece which doesn’t go into the nitty-gritty of setting up Triberr, finding tribes and so on, but as I said I didn’t want to write a novel in a blog post 😉 . Ultimately, even if you’re not technically-minded, once Triberr is set up, it’s just a matter of going in once a day, going to your stream and hovering over that share button for each post you want to share. Technology does the rest for you. If you don’t want to share a post, then click the hide link. You’ll soon get into a rhythm. Once your stream is empty, give yourself a pat on the back and move onto the next item on your to-do list. But don’t forget to watch traffic to your site increase, especially if you’ve taken the time to write engaging blog post titles – something I personally am working on improving, and am already seeing results.

So, there’s Triberr in brief. If I end up with lots more questions and feedback on this post, then I may well write another article in a couple of weeks about the more nitty-gritty side of things. Alternatively, you could just pay me to get you set up on Triberr then sit back and reap the rewards 😉

P.S. If you’re an erotica or erotic romance author and want to get started – come check out my tribe.

Using Twitterfeed to Promote Blog Posts

Do you spend ages Tweeting, Facebooking in LinkedIn-ing (think I just made up a new word there) your blog posts? Perhaps you contribute to several other blogs, as well as your own, and all that social networking takes up too much time. Time you could be using to plot, write or edit your next book!

Never fear, Twitterfeed is here. In a few simple steps, you can be letting Twitterfeed do all the hard work for you.

1. Go to Twitterfeed.com and sign up for an account.

2. Add your first feed by clicking ‘create new feed.’

3. Add the feed name and the URL, then click ‘test rss feed’ to make sure it works.

4. Click ‘advanced settings.’ Check each of the settings to make sure they’re what you want. The most useful I found, particularly if you contribute to a group blog, is ‘post prefix.’ That way you can add text to show that it’s from a blog you contribute to, but not necessarily your post. For example, I prefix with ‘From BlogName.’

5. Continue to step two. You now have three available services; Twitter, Facebook and LinkedIn. Follow the steps to add the Twitter account you’d like to feed the blog posts to. Then repeat the same steps for Facebook and LinkedIn. Pay particular attention to the Facebook settings, as you have the option to post to your regular wall, or you can post to a page, instead.

6. When you’ve selected all the services you want to post to, click ‘All Done!’ and you’ll receive confirmation that your feed is set up and ready to post automatically.

7. Click to go to your dashboard, and you’ll see the feed you just set up, ready and raring to go. Simply repeat from number 2 on this post to add more feeds.

And there you have it! Effort free blog post promotion for yourself and your fellow bloggers!

What You Need To Know About Blog Tours

  • What is a blog tour?

A blog tour is a way to publicise you and your book. You write guest blog posts or answer interviews which are then posted on carefully chosen host blogs on a set date.

  • What are the advantages?

It’s great publicity which boosts sales! As you’ll be appearing on a different blog each day you have the chance to gain yourself new readers, let existing readers know about your new releases and get your work added to those all important to be read lists! You are given the opportunity to speak to readers and engage with them, increasing your chances of them checking out your books.

  • What is a guest blog post?

A guest blog post is where you write something that will be of interest to readers, whether it’s about your writing process, your characters, your inspiration, etc. These are then posted on a host blog along with your book cover and buy links to make readers aware of you and your work.

  • What should I write about?

See How To Write Guest Blog Posts for more information on this.

  • Should I write something new for each stop on the tour?

You don’t have to, though it’s highly recommended. Some tour hosts will insist that your content is unique  as sending the same thing out to more than one blog has several drawbacks: the search engines penalise for duplicate content, meaning your post is less likely to be ranked highly; it looks like you can’t be bothered to write new content; there may be people following you on each stop of your tour and they won’t be happy to see the same posts appearing and with each new discussion you have more chance of drawing in different readers as you’re giving them a new ‘hook’ and making them interested in you and your work.

  • What happens after the post is made live?

The post will be publicised on social networks as outlined in the Blog Tour Packages information, but you will also need to publicise this yourself. Send emails to your friends, post something on your own blog and send out links via your own social networks. The more visitors you have, the better. Also, you must check back periodically to see if there have been any comments on your piece and answer them and any questions where applicable.

  • How long does a blog tour last?

That’s up to you. Packages range from one week to four. For more information, visit the Blog Tour Packages page.

  • What do I need to supply for a blog tour?

See Blog Tour Requirements for a list.

  • Your prices are all in GBP – does that mean you only work for UK authors?

No, though I’m in the UK so you’ll need to pay me in GBP. Use a free currency converter to find out the rough cost in your currency. Then you can use PayPal to send funds to me in GBP.

  • I want in. How do I go about booking a blog tour?

Visit the Blog Tour Calendar & Sign Up Page to find out what dates are available and send me your information.

Brand New Website & Now Booking for February

Today I added another satisfied customer to my portfolio! Diane Alberts, a romance writer, asked me to create a new website for her and her fast growing collection of books, and today the project was completed. As is the case with these projects, there was lots of to-ing and fro-ing, but the site is now complete and Diane has let me know she’s very happy with the results. So much so, that she wrote me this glowing recommendation:

Lucy listened to what I wanted, and gave me all of it..but in a better version than what I’d pictured! I asked for beauty and simplicity, and she followed through. Her updates were frequent, and she never left me wondering if she was working hard on my site- I knew she was! I highly recommend Lucy if you want a friendly, knowledgeable, detail-conscientious web designer!

Check out the newly-updated DianeAlberts.com here!

In other news, I’ve scheduled several blog tours of late, and I’m now scheduling into February. So if you’re looking to run a blog tour for your new book, please contact me ASAP to make sure you get the dates you require! More info and pricing on blog tours here.

An Easy Way to Be Recognised Across the Internet

Do you have a blog? Do you visit other blogs regularly, and make comments? Good! You’re being social and making friends and contacts.

But have you ever wondered why some commenters have nice little photos of themselves by their comments, but you’ve just got a generic image? It’s because you need to set it up.

The “Web 2.0” term for these photos is “avatar”. Your photo is your avatar. You’ll see them on Twitter, WordPress, Blogger, Tumblr… the list goes on. Ideally, if you’re promoting yourself, this avatar should be the same across all your social networks. This helps people, particularly if they connect with you on more than one of the networks, to associate that photo with you. They’ll remember you more easily when they see you elsewhere.

On some networks, like Twitter for example, you just upload a photo of your choice. That becomes your avatar, and it’s as simple as that. However, when leaving comments across the web, it’s not that easy. That’s why you see so many generic images. But it’s very easy to set up so your image appears in these places.

Sign up for Gravatar. A “gravatar” is a globally recognized avatar, to quote their website. All you have to do is register an account – it’s free – upload your avatar and it’ll then follow you across the Internet to all compatible websites, which are many.

So what are you waiting for? Turn yourself from a generic image to you, in a few simple steps! Just go to http://en.gravatar.com/ and get signed up! Test it out here when you’re done, if you like!